her defasında arıyorduk buraya koyalım dedik.
http://proxy-list.org/en
Sunday, May 13, 2007
Create User in LDAP
http://brentp.net/2007/02/20/create-user-in-ldap/
Recently i’ve been playing with WS2003 in a Virtual Machine, and i’ve had to create some stuff to automatically setup a user with a roaming profile, and a home directory (and set the appropriate permissions). Enjoy. Save it as createUser.vbs, double click on it and you’re ready to go. NOTE: You might want to remove some domain specific stuff (and if you have special OU’s, edit the script accordingly. The script assigns permissions to the users profile/home dir folders, in this script it gives Administrator full control, and the user themselves full control.
1: Option Explicit
2: Dim wshShell
3: Dim strUser
4: Dim objRootLDAP, objContainer, objNewUser
5: Dim fso
6: Dim profilePath
7: Dim strFullName
8: dim strPassword
9: Dim homePath
10: Set fso = CreateObject(“Scripting.FileSystemObject”)
11: 12: Set wshShell = WScript.CreateObject(“WScript.Shell”)
13: 14: strUser = InputBox(“User Name?”, “Prompt”, “”, 100, 100)
15: strFullName = InputBox(“Full Name?”, “Prompt”, “”, 100, 100)
16: strPassword = InputBox(“Password?”, “Prompt”, “”, 100, 100)
17: 18: ‘ Bind to Active Directory, Users container.
19: Set objRootLDAP = GetObject(“LDAP://rootDSE”)
20: Set objContainer = GetObject(“LDAP://cn=Users,” & _
21: objRootLDAP.Get(“defaultNamingContext”))
22: 23: homePath = “\HURRICANEHomes”+strUser
24: profilePath = “\HURRICANEProfiles”+strUser
25: 26: Dim objFSO
27: Set objFSO = CreateObject(“Scripting.FileSystemObject”)
28: 29: 30: If fso.FolderExists(homePath) = False Then
31: fso.CreateFolder(homePath) 32: End If
33: 34: If fso.FolderExists(profilePath) = False Then
35: fso.CreateFolder(profilePath) 36: End If
37: 38: ‘ Build the actual User.
39: Set objNewUser = objContainer.Create(“User”, “cn=” & strUser)
40: objNewUser.Put “sAMAccountName”, strUser
41: objNewUser.Put “userPrincipalName”, strUser + “@homegroup.int”
42: objNewUser.Put “displayName”, strFullName
43: objNewUser.Put “HomeDirectory”, “\HURRICANEHomes”+strUser
44: objNewUser.Put “profilePath”, “\HURRICANEProfiles”+strUser
45: objNewUser.SetInfo 46: objNewUser.SetPassword strPassword 47: objNewUser.Put “userAccountControl”, 512
48: objNewUser.SetInfo 49: 50: Dim intRunError
51: Dim strHomeFolder
52: strHomeFolder = “\HURRICANEHomes”+strUser
53: If strHomeFolder <> “” Then
54: If Not objFSO.FolderExists(strHomeFolder) Then
55: On Error Resume Next
56: objFSO.CreateFolder strHomeFolder 57: If Err.Number <> 0 Then
58: On Error GoTo 0
59: Wscript.Echo “Cannot create: “ & strHomeFolder
60: End If
61: On Error GoTo 0
62: End If
63: If objFSO.FolderExists(strHomeFolder) Then
64: ‘ Assign user permission to home folder.
65: intRunError = wshShell.Run(“%COMSPEC% /c Echo Y| cacls “_
66: & strHomeFolder & ” /t /c /g Administrators:f “_
67: & strUser & “:F”, 2, True)
68: If intRunError <> 0 Then
69: Wscript.Echo “Error assigning permissions for user “ _
70: & strUser & ” to home folder “ & strHomeFolder
71: End If
72: End If
73: End If
74: 75: Dim strProfileFolder
76: strProfileFolder = “\HURRICANEProfiles”+strUser
77: If strProfileFolder <> “” Then
78: If Not objFSO.FolderExists(strProfileFolder) Then
79: On Error Resume Next
80: objFSO.CreateFolder strProfileFolder 81: If Err.Number <> 0 Then
82: On Error GoTo 0
83: Wscript.Echo “Cannot create: “ & strProfileFolder
84: End If
85: On Error GoTo 0
86: End If
87: If objFSO.FolderExists(strProfileFolder) Then
88: ‘ Assign user permission to home folder.
89: intRunError = wshShell.Run(“%COMSPEC% /c Echo Y| cacls “_
90: & strProfileFolder & ” /t /c /g Administrators:f “_
91: & strUser & “:F”, 2, True)
92: If intRunError <> 0 Then
93: Wscript.Echo “Error assigning permissions for user “ _
94: & strUser & ” to profile folder “ & strProfileFolder
95: End If
96: End If
97: End If
98: WScript.Echo(“Done.”)
99: WScript.Quit
http://www.computerperformance.co.uk/vbscript/vbscript_user_create.htm
Our Mission and Goal
Tutorial for Creating a User Account with VBScript
This page has VBScript examples, which show you how to create User accounts in your Windows Server 2003 domain. I urge you to trust me, and build your scripts in stages. The benefit of creating scripts in small sections is that not only do you understand each part, but also your brain will see ways of applying a section in a different scenario. For example, once you learn how to bind with Active Directory to create a User object, it's easy to modify the script and create a Computer object instead.
Topics for Creating a User Account with VBScript
- Our Mission and Goal
- Example 1: Script to Create a User in Active Directory
- VBScript Tutorial - Learning Points
- Example 2: Script to Create a User in a Named OU
- Summary for Creating User Accounts
Our Mission and Goal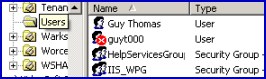
Our first goal is to create a User account in Active Directory's Users container. A more realistic mission is to create users in a named OU, and we will tackle that goal in the second example.
Example 1 - Script to Create a User in Active Directory
On this page we concentrate on the essential VBscript commands necessary to build a User account in Active Directory Users and Computers. For example, GetObject("LDAP://rootDSE") and .Create("User"). Even though I am experienced at creating VBScripts, I still run manually through creating the object in Active Directory Users and Computers, the menus actions help me to rehearse the stages in my scripts.
Prerequisites
I recommend that you logon at a Windows Server 2003 domain controller. If you are a long way from the server, Remote Desktop would be a suitable alternative. If that is not possible, you could get these scripts to work from an XP machine as a non-administrator. However, why introduce extra complications? Especially at the beginning, you want easy success, with fewest obstacles.
Instructions for Creating a User Account in Active Directory
- You should run this VBScript on a Windows Active Directory domain.
- Copy and paste the example script below into notepad or a VBScript editor.
- Decide whether to change the value for strUser. DomGuy2 is not a particularly attractive name.
- Save the file with a .vbs extension, for example: Users .vbs.
- Double click Users .vbs and check the Users container for strUser.
Script to Create a User in a Named OU (Organizational Unit)
' Users .vbs
' Sample VBScript to create a User in Users .
' Author Guy Thomas http://Computerperformance.co.uk/
' Version 1.3 - September 2005
' ------------------------------------------------------'
Option Explicit
Dim strUser
Dim objRootLDAP, objContainer, objNewUser
strUser = "DomGuy2"
' Bind to Active Directory, Users container.
Set objRootLDAP = GetObject("LDAP://rootDSE")
Set objContainer = GetObject("LDAP://cn=Users," & _
objRootLDAP.Get("defaultNamingContext"))
' Build the actual User.
Set objNewUser = objContainer.Create("User", "cn=" & strUser)
objNewUser.Put "sAMAccountName", strUser
objNewUser.SetInfo
WScript.Quit
' End of free sample Create Users VBScript.
VBScript Tutorial - Learning Points
Note 1: The first 10 lines explain the purpose of the script and declare the variables.
Note 2: The simple, but clever command, which allows the script to work with any domain is: GetObject("LDAP://rootDSE"). Crucial, this statement binds WSH / VBScript to Active directory. The next line puts the focus on the Users container, as that is where the user will be born. Incidentally, the correct syntax is cn=users, whereas OUs that you create need the OU= prefix, for example OU=Accounts,.
Note 3: sAMAccountName controls the logon name, this is the name that users should enter in the dialog box after they press the Ctrl Alt Delete, logon sequence.
Note 4: .Create is a method to build an object. See how we use "User" not "Computer" or "OU".
Note 5: When creating or modifying users, invariably you need .put and .SetInfo. The .put method is the equivalent of selecting a box in Active Directory Uses and Computers, in this example sAMAccountName sets the correct property and .put unloads the value set by strUser. .SetInfo is the VBScript equivalent of pressing the OK button in the GUI. In both cases it represents the final act of creating or modifying the User object.
Note 6: This script represents 'work in progress'. For a real production script you would need to enable the account, and most likely, add several other properties, for example givenName. My desire is to get you started. Build the script in stages, understand each component, then add another section. ®
Example 2: Script to Create a User in a Named OU (Organizational Unit)
Prerequisites
Create a new OU. I called my OU Accounts, what name will your choose?
Instructions for Creating a User Account in a Named OU
- Copy and paste the example script below into notepad or a VBScript editor.
- Find the strContainer, and then change to the name of your OU.
- Decide whether to change the value for strUser.
- Save the file with a .vbs extension, for example: ComputerOU.vbs.
- Double click ComputerOU.vbs and check the Computers container for strComputer.
' UserOU.vbs
' Sample VBScript to create a User in a named OU.
' Author Guy Thomas http://Userperformance.co.uk/
' Version 2.4 - September 2005
' ------------------------------------------------------'
Option Explicit
Dim objRootLDAP, objContainer, objUser, objShell
Dim strUser, strName, strContainer
strUser = "BookKeeper21"
strName = "Bookie"
strContainer = "OU=Accounts ," ' Note the comma
' Bind to Active Directory, Users container.
Set objRootLDAP = GetObject("LDAP://rootDSE")
Set objContainer = GetObject("LDAP://" & strContainer & _
objRootLDAP.Get("defaultNamingContext"))
' Build the actual User.
Set objUser = objContainer.Create("User", "cn=" & strUser)
objUser.Put "sAMAccountName", strUser
objUser.Put "givenName", strName
objUser.SetInfo
' Optional section to launch Active Directory Uses and Users
Set objShell=CreateObject("WScript.Shell")
objShell.Run "%systemroot%\system32\dsa.msc"
WScript.Quit
' End of Sample UserOU VBScript.
VBScript Tutorial - Learning Points
Note 1: The key difference between the two scripts is: strContainer = "OU=Accounts ,". Trace how VBScript applies this variable to set the Organizational Unit.
Note 2: This command looks easy to script: GetObject("LDAP://" & strContainer & _. However it took me ages to get the speech marks and ampersands (&) just right.
Note 3: objShell.run. This optional section is just me having a little fun. What this section does is open the Active Directory Users and Users MMC ready for you to inspect the new User account. My other reason for adding this code is show that the script has executed successfully, otherwise I just sit and wonder if it has finished yet.
Note 4: I suggested in Example 1 that you could add other attributes, trace how I added givenName through strName. To see what I mean, I suggest that you alter the value from "Bookie" to a more realistic name. ˇ
Summary of Creating User Accounts
The first example script shows you how to create a new user account in your Windows Server 2003 domain. In the second example we control the name of the OU where the account appears in Active Directory Users and Computers. The tutorial's hidden agenda is learning how to apply the VBScript object, methods and value technique. There is one other guiding principle, start simply. Build complex scripts in stages.
Monday, May 07, 2007
Via warns of hard drive chipset incompatibility
Via warns of hard drive chipset incompatibility
There are fixes, so watch out
By INQUIRER staff: Salı 26 Temmuz 2005, 12:04

It said that VT8237 and VT8237R chipsets don't provide forward compatibility for S-ATA II, which is important as hard drive makers are beginning to manufacture this type of drive.
But Via is readying the release of VT8237R Plus, which will solve the problem. This means that motherboard makers that use the former chipset should clear their inventory before September.
Hard drive manufacturers position with S-ATA II is as follows, said Via in its note. Western Digital and Samsung are already shipping these devices, while Seagate and Maxtor will start shipping them during this quarter.
If you connect S-ATA II drives to an old Via chipset which includes the VT8237, VT8237R, VT6420 and VT6421L, the devices won't be detected.
Some mobo makers, such as Epox, have already responded to the problem and have warned their customers to seek the support of hard drive vendors. In a letter to its customers, it said that they should also check the specs of other manufacturers' Via based motherboards.001 li dosyaları nasıl açıyoruz
How to extract 001 files?
Most of the archived files that you can download from binary Usenet newsgroups have the following filenames: name.part01.rar, name.part02.rar, name.part03.rar etc. You can extract those files with WinRAR of the free program 7-Zip. But sometimes you will see files with the following filenames: name.001, name.002, name.003 etc, which I will call 001 files. In this tutorial you will learn how to extract these files. Extracting isn't the right name though: normally these files are not compressed like RAR files, but just split by a file splitter, without compression. Joining would be a better term for what we are about to do.
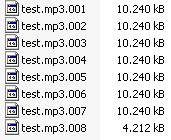
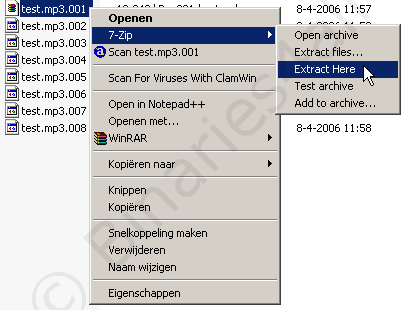
In this tutorial we will try to join the test.mp3 file that I made. As you can see in the image below this file is split into eight pieces that we have to join before we can listen to the test.mp3 file.
We can do this with three different programs: WinRAR, 7-Zip and HJSplit. It is up to you to choose which program you would like to use for this task: WinRAR, 7-Zip or HJSplit. Because many people have WinRAR installed on their PC, I will explain that program first. WinRAR isn't the best fit for this task though, so if you currently do not use WinRAR, just skip the next part and use 7-Zip or HJSplit.
Joining with WinRAR
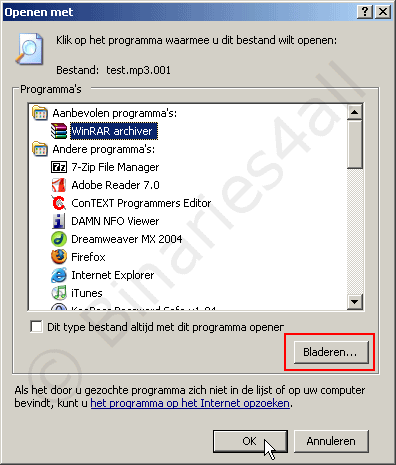
Open the first file of the archive (name.001) with WinRAR by double clicking on it in the Windows Explorer. Normally a window will appear asking you which program should be used to open the 001 file (this is because Windows might not know which programs are capable of opening 001 files). So select WinRAR in that window. If WinRAR isn't listed, press the 'Browse' button and navigate to the WinRAR folder on your computer (probably C:\Program Files\WinRAR) and select WinRAR. Finally press the 'OK' button.
Now there are two possibilities:
1) WinRAR is able to open the file successfully. Now you can extract the archive in the same way you would extract normal RAR archives, as explained in the WinRAR tutorial.
2) WinRAR is unable to open the archive and you get the following error message:
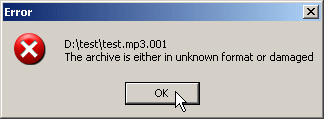
In that case WinRAR is unable to join the files, so we have to try the programs 7-Zip or HJSplit. Both programs are free and will be explained below.
Joining with 7-Zip
The free program 7-Zip is better than WinRAR in joining 001 files.
After installing 7-Zip, right click on the first file (name.001) in the Windows Explorer and choose 'Extract here' in the 7-Zip submenu of the context menu. 7-Zip will extract the archive and place the extract files into the same directory as where the source files are located. You could also choose 'Open archive' to view the archive in 7-Zip or extract the file to another directory by choosing 'Extract files'. Easy!
Joining with HJSplit
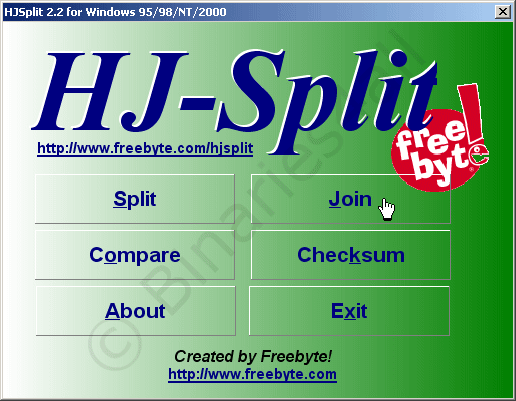
There is a great chance that the person who posted the files used the program HJSplit to split the file to create 001 files. This freeware program is also able to join 001 files.
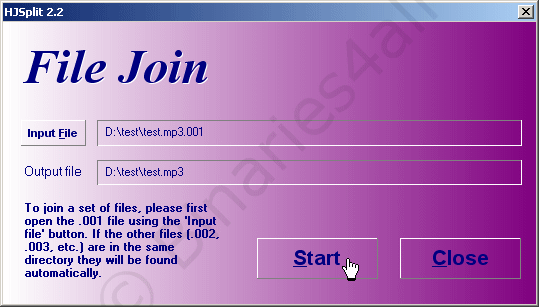
You do not have to install HJSplit. Just extract the 'hjsplit.zip' and double click on HJSplit.exe to start HJSplit. The main window of HJSplit appears. Since we want to join the files, click on 'Join':
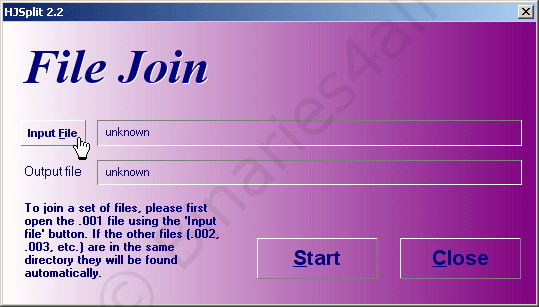
Click on 'Input file' in the new window:
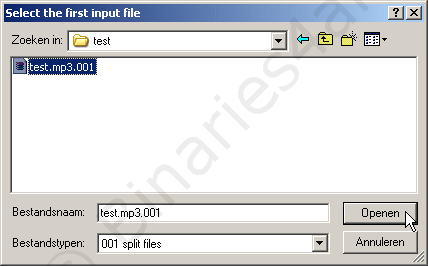
In the new window select the first file of the files that we would like to join, so test.mp3.001 in this case, and click on 'Open' after that.
Click on 'Start':
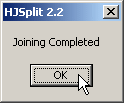
Now HJSplit will join the file. When it is finished you will see this message:
Subscribe to:
Posts (Atom)